Using the Navigation Manager |
Learn more about Verizon Connect GeoBase.
Get information about the latest release
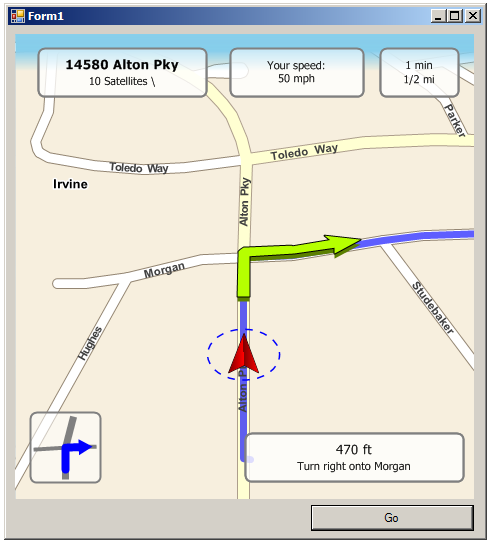
NavigationManager provides navigation services including visual route guidance, audible announcements and GPS filtering. Feedback from the NavigationManager is provided by UI controls that include a TurnBox to indicate upcoming turns and LabelBoxes that display details of the current address, speed, ETA and upcoming direction instructions.
These controls may be set using the SetControls(LabelBox, LabelBox, LabelBox, TurnBox, LabelBox) method.
After reading this tutorial you should be able to create a sample application that will use the NavigationManager to display UI elements that guide the user to a specified destination, and provide useful navigation information such as speed and estimated time of arrival, with the assistance of a GPS device.
It is not necessary to have an actual GPS device on-hand. The SimulatedGps class will function as a substitute. |
A NavigationManager will detect when driving directions are not followed and automatically recalculate the optimal route to the destination.
Our test application will:
navigate to a destination
draw the NavigationManager object's calculated route on the map
display the current location (as a street address) and the current number of GPS satellite fixes
display the current vehicle speed (in the NavigationManager object's specified units)
display the estimated time and distance remaining to the destination
display a TurnBox indicating current and upcoming direction movements
display natural-language text directions to the destination
audibly alert the user to current and upcoming NavigationEvents
NavigationManager implements the IMapRenderer interface. To draw a NavigationManager we can add it to our map's RenderList. |
This tutorial assumes basic knowledge of GeoBase routing and the creation of a simple GeoBase application.
The following tutorials may provide useful background reading:
Create a new Visual Studio Project. Add the following controls to the form:
A GeoBase map control named mapMain
A button named buttonGo
When run your application should appear similar to the screenshot below:
To make the code simpler and more readable, add the following using directives to the top of the project form.
using Telogis.GeoBase;
using Telogis.GeoBase.Navigation;
Add the following NavigationManager, RenderList, TurnBox and four LabelBoxes to the top of the form, such that they are global.
NavigationManager manager;
RendererList renderList = new RendererList();
TurnBox turnBox = new TurnBox();
LabelBox addressBox = new LabelBox();
LabelBox instructionBox = new LabelBox();
LabelBox speedBox = new LabelBox();
LabelBox etaBox = new LabelBox();
Add a map load event. We will use this event to configure our NavigationManager and to turn off the visibility of our LabelBoxes and TurnBox until we have initiated our buttonGo click event. Paste the following code into the mapMain_Load method.
/* set the map anchor to allow the map size to be adjusted */
mapMain.Anchor = AnchorStyles.Bottom | AnchorStyles.Left | AnchorStyles.Top | AnchorStyles.Right;

/* turn off the visibility of the instruction, speed and
address boxes - for purely cosmetic reasons */
instructionBox.Visible = false;
speedBox.Visible = false;
addressBox.Visible = false;

/* set map to render everything on our list */
mapMain.Renderer = renderList; /* set map to render everything on our list */
Next, again within the mapMain_Load method, we construct a NavigationManager, specifying the Map object (mapMain in this example), the path to the languages directory and a culture. We will also set the NavigationManager's units to imperial.
/* create a new navigationmanager */
manager = new NavigationManager(mapMain, Settings.GeoBasePath("langs"), "en-US");

/* set the navigationmanager's units to imperial */
manager.Units = UnitSystem.ImperialFeet;
Then create a new SimulatedGps at our starting location, and call the OnUpdate method with every GPS tick (once every second).
/* create a new GPS simulation */
LatLon start = new LatLon(33.65248, -117.71668);
SimulatedGps myGps = new SimulatedGps(start);
manager.SetGps(myGps);
myGps.Update += OnUpdate;
Next, we use SetControls(LabelBox, LabelBox, LabelBox, TurnBox, LabelBox) to set our LabelBox and TurnBox controls.
/* set the navigationmanager's controls to display five UI components */
manager.SetControls(instructionBox, addressBox, speedBox, turnBox, etaBox);To disable a NavigationManager UI control, set it to null. |
Then we add our NavigationManager to the RenderList.
/* add the navigationmanager to the renderlist */
renderList.Add(manager);
Add a click event to buttonGo. We will use the click event to set NavigationManager's destination as a LatLon. Add the following code to the click event.
/* set the navigationmanager's destination */
LatLon myDestination = new LatLon(33.64992, -117.71189);
manager.SetDestination(myDestination);

instructionBox.Visible = true;
speedBox.Visible = true;
addressBox.Visible = true;
Next, we add a new OnUpdate method, called by the myGps object's Update eventhandler. We will use this method to update the position of our TurnBox and four LabelBoxes if the map size is changed.
private void OnUpdate(object sender, EventArgs e) {
  /* set the size and location of the address box */
  addressBox.Width = 180;
  addressBox.Height = 60;
  addressBox.Left = 10;
  addressBox.Left = mapMain.Left + 10;
  addressBox.Top = mapMain.Top;

  /* set the size and location of the navigation instructions box */
  instructionBox.Width = 230;
  instructionBox.Height = 60;
  instructionBox.Left = mapMain.Width + instructionBox.Width - 465;
  instructionBox.Top = mapMain.Bottom - instructionBox.Height - 20;
  instructionBox.MajorFont = new System.Drawing.Font("Tahoma", 10, System.Drawing.FontStyle.Regular);

  /* set the size and location of the current speed box */
  speedBox.Width = 145;
  speedBox.Height = 60;
  speedBox.Top = mapMain.Top;
  speedBox.Left = mapMain.Width / 2 - 20;

  /* set the size and location of the turn box */
  turnBox.Width = 80;
  turnBox.Height = 80;
  turnBox.Top = mapMain.Bottom - turnBox.Height - 20;
  turnBox.Left = 10;

  /* set the size and location of the eta and remaining distance box */
  etaBox.MajorFont = etaBox.MinorFont;
  etaBox.Width = 90;
  etaBox.Height = 60;
  etaBox.Top = mapMain.Top;
  etaBox.Left = mapMain.Width + etaBox.Width - 190;
}
We will also use SetZoomAtSpeed(Int32, SpeedValue, TimeSpan) and SetZoomAtDistance to adjust the zoom level of the map according to the vehicle's speed and distance from our destination.
At speeds of 20 miles per hour or less, the zoom value will be 120% of the current zoom level. At speeds above 40 miles per hour, the zoom level will be 300% of the current zoom level. When we are less than 800 feet from our destination, the zoom level will be 40% of the current zoom level.
Add the following code to the bottom of the mapMain_load method.
/* use DynamicZooms to change the map zoom level according to the vehicle's speed*/
manager.MapControlMode = NavigationManager.MapMode.DynamicZooms;
manager.DynamicZoomSettings.Clear(); // Removes the default values
manager.DynamicZoomSettings.HysteresisLimit = new SpeedValue(5, SpeedUnit.MilesPerHour);
manager.DynamicZoomSettings.SetZoomAtSpeed(120, new SpeedValue(20, SpeedUnit.MilesPerHour), new TimeSpan(0, 0, 2));
manager.DynamicZoomSettings.SetZoomAtSpeed(300, new SpeedValue(40, SpeedUnit.MilesPerHour), new TimeSpan(0, 0, 2));
manager.DynamicZoomSettings.SetZoomAtDistance(40, 800, DistanceUnit.FEET, new TimeSpan(0, 0, 2));
Run the application. After clicking the 'Go' button, your simulated location and heading will be shown on the map, together with a highlight overlaying the calculated route. As the route is navigated, LabelBoxes will display the nearest street address, the vehicle's speed, ETA (time and distance) to the destination and natural-language directions. A TurnBox will indicate upcoming turns, and audible direction instructions will be played.
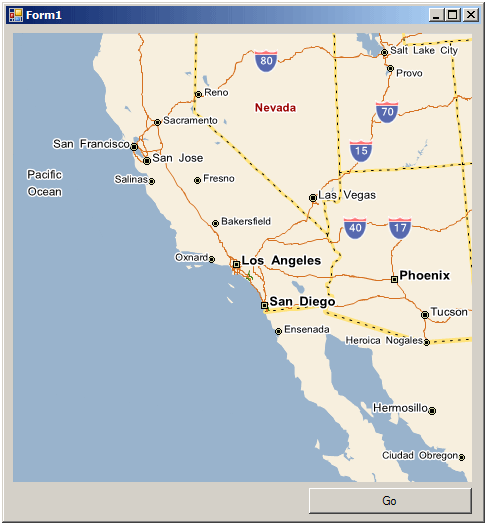
As the vehicle's speed changes, and as the destination approaches, the map zoom will adjust.
The application will appear similar to the screenshot below: