Creating the Basic Project |
Learn more about Verizon Connect GeoBase.
Get information about the latest release
In this topic we will create a new Windows Forms application and place a MapCtrl object and other supporting controls (such as a search box and text boxes) on the form.
Create a new Windows Forms project in Visual Studio. Name the project Map Explorer Lite.
Before we write any code we should add references to the GeoBase DLL. Do this now:
- From the menu select View | Solution Explorer
- Right-click on References and select Add Reference...
- Select GeoBase from the list, and click 'OK'
If GeoBase isn't listed you'll have to select the 'Browse' tab and locate geobase.net.dll manually. The GeoBase installer places geobase.net.dll in the C:\Program Files\Telogis\GeoBase\bin directory by default. |
When running under .NET 4, GeoBase will require the .NET 4 Full Profile rather than the .NET 4 Client Profile. |
The next step is to add a MapCtrl to the form. Open your form in the Designer and select View | Toolbox. The MapCtrl control should be visible under the My User Controls group.
The GeoBase installer places all the GeoBase controls in your Toolbox by default. If, for some reason, the controls aren't in your Toolbox you'll need to complete the following steps:
If you still can't find the MapCtrl, click 'Browse' and locate geobase.net.dll (the installer places the DLL in the C:\Program Files\Telogis\GeoBase\bin directory by default). MapCtrl should now be visible in the list of available controls. |
Select the MapCtrl and drag a box on the Form to create a map in that area. Name the new object mapMain using the Properties window.
Repeat the procedure to create a second, smaller Map Control. This should be named mapMini. We will use this smaller map to provide an overview of the area displayed in mapMain.
Switch to the code view. To make the code simpler and more readable, add the following using directives to the top of your source file:
using Telogis.GeoBase;
using Telogis.GeoBase.Routing;
Now add the following fields to the Form class. We will be using these variables throughout the tutorial.
private Directions directions = null;
private LatLon currentMouseLocation;
private BalloonPushPin searchMarker = null;
private RendererList renderList = new RendererList();
private Route route = new Route();
Return to Designer mode and add the following controls:
- Button: buttonSearch
- TextBox: textBoxSearch
- TextBox: textBoxAddress
- TextBox: textBoxLat
- TextBox: textBoxLon
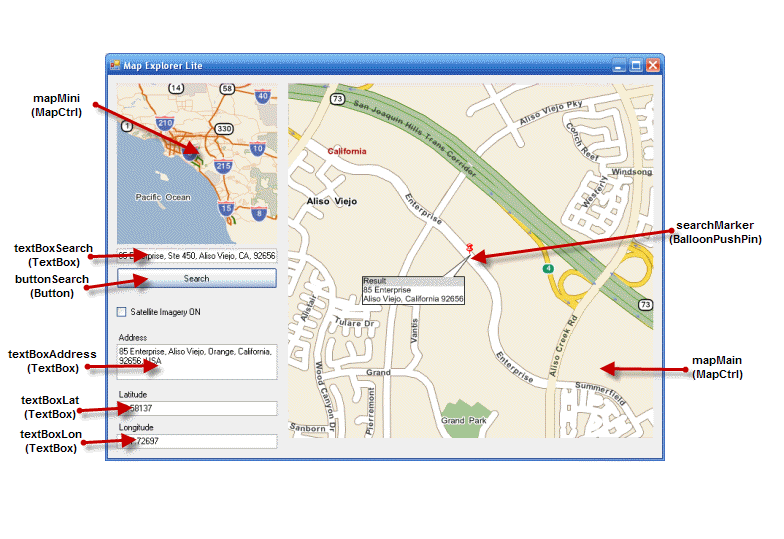
Your form should now look similar to the following labeled screen capture.
We plan to draw multiple features onto mapMain (a Route and a BalloonPushPin) so we need to instruct the map to use a RendererList (a list of items to render).
Double-click your form to create a Form1 Load event. Add the following code to the event:
private void Form1_Load(object sender, EventArgs e) {
  // Set the main map to use the render list
  mapMain.Renderer = renderList;

  // Add the route. The route will only show if it has some stops
  renderList.Add(route);
}
We will use the text boxes to display the street address, and the latitude and longitude for the point in mapMain currently under the mouse cursor.
To do this we need to:
- Get a LatLon object for the current mouse coordinates.
-
Use the geocoder to convert the latitude/longitude to a street address.
 Note
NoteThis process is known as reverse geocoding.
In the Designer view, create a MouseMove event for mapMain, now switch to the Code view and add the following code:
private void mapMain_MouseMove(object sender, MouseEventArgs e) {
    // Steal focus so that the scroll wheel doesn't zoom the mini-map instead
    mapMain.Focus();

    currentMouseLocation = mapMain.XYtoLatLon(e.X, e.Y);
    Address address = GeoCoder.ReverseGeoCode(currentMouseLocation);

    if (address != null) {
        textBoxAddress.Text = address.ToString();
    }

    // Display location information in the status bar
    textBoxLat.Text = currentMouseLocation.Lat.ToString("0.#####");
    textBoxLon.Text = currentMouseLocation.Lon.ToString("0.#####");
}
| You'll need to have created the text box components as illustrated in the screenshot above. |
Adding a Mini-Map demonstrates how to keep the mini-map view synchronized with that of the main map.