Auxiliary Layers |
Learn more about Verizon Connect GeoBase.
Get information about the latest release
In the previous tutorial, Adding a Traffic Layer, we rendered traffic shields on a new layer. This involved the use of Chameleon Custom Map Styles and auxiliary layers. Using auxiliary layers it is possible to render Label Objects on new layers above the base layer. This is useful if you want labels to be rendered in a specific order.
The following example demonstrates the steps needed to render labels on new auxiliary layer. Only three steps are required:
Create new TileLayers as necessary and specify the layer number using the auxlayer property
Update the JavaScript map object to include a tileLayerConfig argument
Specify the auxiliary layer target on the Label Object in the .cam file using the auxiliarylayer property
Step 1. Create a new TileLayer and specify the layer number for the cam or ecm file. In the example below we will use layer 1 (layer 0 is the base layer).
var TileLayer = Telogis.GeoBase.MapLayers.TileLayer;
new TileLayer ({id: 'my_auxiliary_layer', map: map, tileConfig:{args: {auxlayer: '1', s: 'my_cam_or_ecm_file'}}});
Step 2. Add the tileLayerConfig argument to the map object.
var map = new Map ({id: "main_map", size: new Size (640, 480), tileLayerConfig:{tileConfig:{args: {auxlayer: '0', s: 'my_cam_or_ecm_file' }}}});
Step 3. Set the auxiliarylayer property in the .cam file Label Object to '1' (this is the layer number being targeted on the Label object). This should be set for all objects that you want to render on the new auxiliary layer(s). When not set, this property defaults to '0'.
For example, from:
!someObject = label<font<arial-bold,7,(255,252,249)>,5,100,50>;
To:
!someObject = label<font<arial-bold,7,(255,252,249)>,5,100,50,1>;
This example modifies the scripts used for the Adding a Traffic Layer tutorial. If you have not yet completed this tutorial, you must do so before proceeding below. |
Navigate to the 'Map Styles' example folder (typically at C:\Program Files\Telogis\GeoBase\Verizon Connect GeoBase Examples\Map Styles). Copy the monochrome.cam file and move it to the Telogis\GeoBase\GeoStream\server\Bin\Styles folder. Re-name the monochrome.cam copy to myExample.cam
Navigate to Telogis\GeoBase\GeoStream\server\scripts and open simplemap.aspx.
Replace:
var map = new Map ({id: 'main_map', size:  new Size (640, 480), tileLayerConfig:{tileConfig:{args:{auxlayer: '0'}}}});
new MapLayers.TrafficLayer({map: map, id: 'main_map_traffic', source: 'TrafficData'});
new TileLayer ({id: 'main_map_auxiliary', map: map, tileConfig:{args: {auxlayer: '1'}}});
With:
var map = new Map ({id: "main_map", size:  new Size (640, 480), tileLayerConfig:{tileConfig:{args:{auxlayer: '0', s: 'myExample'}}}});
new MapLayers.TrafficLayer({map: map, id: 'main_map_traffic', source: 'TrafficData'});
new TileLayer ({id: 'main_map_auxiliary', map: map, tileConfig:{args: {auxlayer: '1', s: 'myExample'}}});
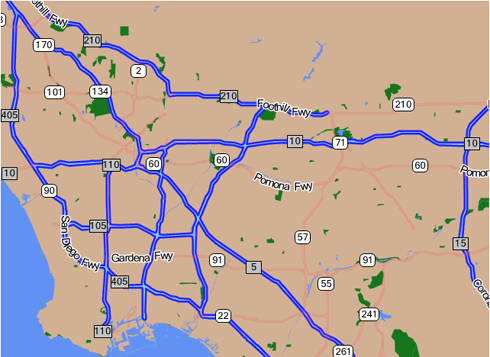
Load the simplemap.aspx page in a web browser (http://localhost/GeoStream/scripts/simplemap.aspx). You should see something similar to the following. Note that the traffic layer is rendered over the highway shields.
Now, open the myExample.cam file in Verizon Connect GeoBase WorkBench. We will use the auxiliarylayer parameter on the Label object by replacing the following line:
!label = label<FONT<"Microsoft Sans Serif",9,(0,0,0),pen<(255,255,255),3>>,5,100>
With:
!label = label<FONT<"Microsoft Sans Serif",9,(0,0,0),pen<(255,255,255),3>>,5,100,1>
Repeat the previous edit by replacing:
!label2 = label<FONT<"Microsoft Sans Serif",9,(0,0,0)>,30,100, 40>
With:
!label2 = label<FONT<"Microsoft Sans Serif",9,(0,0,0)>,30,100, 40,1>
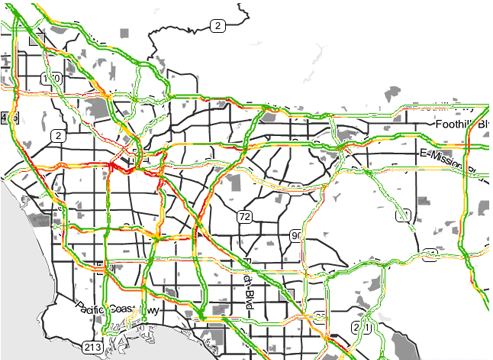
Load the simplemap.aspx page in a web browser once again. Note that the highway shields are now being rendered on layer 1, above the traffic layer, and are therefore no longer obscured.
<%@ Page Language="C#" Src="AuthenticatedPage.aspx.cs" Inherits="AuthenticatedPage" %>

<html xmlns="http://www.w3.org/1999/xhtml">
<head>
<title>Auxiliary Layers Demo</title>

<script type="text/javascript" src="<% GetAPISource (); %>"></script>
<script type="text/javascript">

var main = function () {

    var GeoBase   = Telogis.GeoBase;
    var MapLayers = GeoBase.MapLayers;
    var Map       = Telogis.GeoBase.Widgets.Map;
    var Size      = Telogis.GeoBase.Size;
    var TileLayer = Telogis.GeoBase.MapLayers.TileLayer;

    // The call to set the internal GeoBase authentication token should be made at
    // the start of the entry function, as it is a prerequisite for any requests
    // made to the server.

    GeoBase.setService (<% GetService (); %>);
    GeoBase.setAuthToken (<% GetToken (); %>);

    // By default, a newly created map object has its DOM tree appended to the
    // document body. To customize where the map is located, either create in the
    // HTML section a div with the same ID, or specify a "parent" configuration option.

    var map = new Map ({id: "main_map", size:  new Size (640, 480), tileLayerConfig:{tileConfig:{args: {auxlayer: '0', s: 'myExample' }}}});
    new MapLayers.TrafficLayer({map: map, id: 'main_map_traffic', source: 'TrafficData'});
    new TileLayer ({id: 'main_map_auxiliary', map: map, tileConfig:{args: {auxlayer: '1', s: 'myExample'}}});
};

</script>
</head>
<body onload="main ();">
</body>
</html>
When rendering a map, whether locally or remotely from a GeoStream server, only one layer will be displayed. This single layer typically contains all polygons, labels, streets, icons and traffic 'flattened' together in their original rendered order.
However, to better differentiate between different street layers (such as roads, tunnels and bridges) when 'flattened', it may be useful to adjust the alpha transparency of individual layers. You might, for example, want to display tunnels with a higher transparency than surface streets to indicate their sub-surface nature. Likewise, you might want to show street layers in a particular order; so streets of greater interest are rendered above streets of lesser interest, for example.
These tasks can be accomplished using the OVERLAY LAYER statement. This statement uses the following formatting:
OVERLAY LAYER [PRELABELLING], SOURCE LAYER NUMBER, TARGET LAYER NUMBER, ALPHA NUMERIC VALUE 0-255
In the following Overlay Layer example we render layer 1 on layer 0 with an alpha transparency of 150 (which equates to a transparency of roughly 50%):
OVERLAY LAYER [PRELABELLING], SOURCE 1, TARGET 0, ALPHA 150
To see Overlay Layer in use, copy the code snippet below over the content of the myExample.cam file.
begin map
!others = (209,176,147)
clear BRUSH<!others>
!label = label<FONT<"Microsoft Sans Serif",9,(0,0,0),pen<(255,255,255),3>>,5,100,1>
!label2 = label<FONT<"Microsoft Sans Serif",9,(0,0,0)> ,30,100,40,1>
!highway = shield<num_only,!label2,box<pen<(0,0,0),1>,brush<(255,255,255)>,20,10>>
!interstate = shield<num_only,!label2,box<pen<(0,0,0),1>,brush<(193,193,193)>,20,0>>
!map = shieldmap<
[starts_with "I-", !interstate],
[default, !highway] >
begin polygons
render[states], BRUSH<(244,244,244)>
render[parks], BRUSH<(24,118,28)>
render[water], BRUSH<(97,145,242)>
end polygons
begin streets
AUX LAYER [STREETS] 1
render [super],[pen<(36,36,255),6>,pen<(136,203,255),1>],!label,null,!map
AUX LAYER [STREETS] 2
render [major],[pen<(255,47,62),3>,pen<(255,125,134),1>],!label,null,!map
end
OVERLAY LAYER [PRELABELLING], SOURCE 1, TARGET 0, ALPHA 255 // super
OVERLAY LAYER [PRELABELLING], SOURCE 2, TARGET 0, ALPHA 255 // major
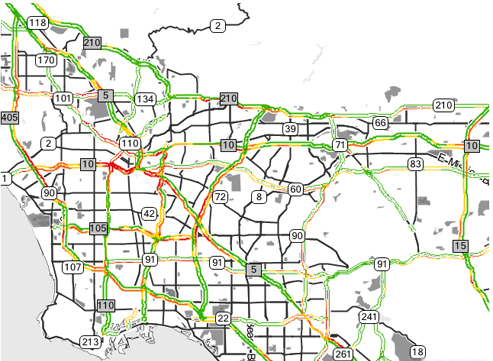
endUsing this example, we render streets (super and major) on two layers: Layers 1 and 2 respectively (Layer 0 is the base layer).
When simplemap.aspx is refreshed in the browser, or the edited .cam file is loaded into Map Explorer (Map Style | Load for Main), the map shown should look similar to the following image:
When viewing via a web browser, disable the traffic layer by removing the following line from simplemap.aspx: JavaScript new MapLayers.TrafficLayer({map: map, id: 'main_map_traffic', source: 'TrafficData'}); |
If using a web browser and the map does not appear as expected, it may be necessary to clear your GeoStream cache. Do so by deleting the contents of the GeoStreamcache folder. This folder is typically located in C:\ProgramData\. |
We will now use Overlay Layer to reduce the alpha transparency of Layer 2, containing the red major streets, by changing:
OVERLAY LAYER [PRELABELLING], SOURCE 2, TARGET 0, ALPHA 255 // major
To:
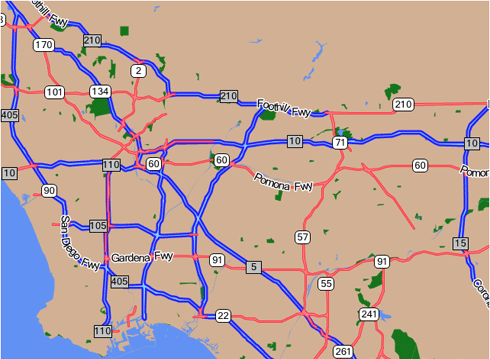
OVERLAY LAYER [PRELABELLING], SOURCE 2, TARGET 0, ALPHA 55 // major
Save the .cam file and refresh your browser or reopen the file in Map Explorer (Map Style | Load for Main). The map should now look similar to the following image. Note the higher transparency of the red major streets.