Routing with Traffic |
Learn more about Verizon Connect GeoBase.
Get information about the latest release
GeoBase provides support for INRIX and HERE traffic data (incident, predictive and real). In addition to these supported data sources it is possible to create your own data source, by implementing ITrafficSource.
This tutorial will step through creating a Route between two RouteStops. The Route will account for traffic conditions specified in an INRIX XML data file.
To use a HERE real-time data source instead of an INRIX real-time data source it's as simple as swapping InrixRealTimeTrafficSource for HERERealTimeTraffic. |
To route through traffic we need to perform the following actions:
- Define a Route with start and end stops. Other stops may also be added if desired.
- Load traffic data. In this tutorial we will load INRIX real traffic data from a local XML file.
- Configure the Route to consider traffic conditions when routing.
- Obtain directions for the Route and an estimated arrival time.
Creating a Route
This subject is covered in-depth in the Creating a Simple Route tutorial. We will create a Route with a start and an end, specified by two LatLon objects.
Route myRoute = new Route(new RouteStop(A), new RouteStop(B));
Creating a Traffic
A Traffic is a collection of traffic data sources. GeoBase will use a Traffic to determine optimum routes with consideration for traffic conditions.
In this example we will use an INRIX traffic data source. This traffic data is supplied as an XML file. We create an XmlReader around the file and pass the XmlReader to the InrixRealTimeTrafficSource(XmlReader) constructor.
We add our newly created InrixRealTimeTrafficSource to an array of ITrafficSources which we use to create a Traffic.
The Traffic constructor takes an argument that is an array of ITrafficSource objects. This allows GeoBase to query a number of traffic data sources (such as both historical and real-time data, where supplied) to determine the optimum route. |
XmlReader myXmlReader = XmlReader.Create(dataFile);
ITrafficSource[] srcs = new ITrafficSource[] { new InrixRealTimeTrafficSource(myXmlReader) };
Traffic myTraffic = new Traffic(srcs);
Routing Through Traffic
The TrafficRouting class allows us to route using our traffic data. We create a new TrafficRouting using our Traffic object and instruct our TrafficRouting to configure our chosen Route object's Strategy to use our Traffic data.
TrafficRouting myTrafficRouting = new TrafficRouting(myTraffic);
myTrafficRouting.setUpRouteStrategy(myRoute.Strategy);
Setting the Time
Because traffic conditions vary depending on the time of day, it is important that our Route knows what time we are leaving the destination. The Route assumes that we are leaving the destination at the current system time in UTC. However, for route planning it may be desirable to override this default assumption, ensuring that the desired time is converted into UTC:
myRoute.CurrentTime = DateTime.UtcNow;
Below is a full code listing that you may copy and paste into your project. It consists of a single function that takes three parameters:
- A start location for a route (as a LatLon)
- An end location for a route (as a LatLon)
- The name of an INRIX XML file containing real-time traffic data
This function will create a route between the specified start and end locations and use the INRIX traffic data to determine an optimum route. However, this function does not return any information.
Although this function does not return any values the Directions object obtained at the end of the function may be used to guide a user along the optimum route, avoiding areas of congestion and seeking areas of free-flowing traffic where appropriate.
private void TrafficRoute(LatLon A, LatLon B, String dataFile) {
  //
  // create a new Route from A to B; note that A and B should
  // be turned into RouteStops first
  //
  Route myRoute = new Route(new RouteStop(A), new RouteStop(B));

  //
  // create a Traffic from our XML data
  //
  XmlReader myXmlReader = XmlReader.Create(dataFile);
  ITrafficSource[] srcs = new ITrafficSource[] { new InrixRealTimeTrafficSource(myXmlReader) };
  Traffic myTraffic = new Traffic(srcs);

  //
  // set up a TrafficRoute and configure the strategy from myRoute
  //
  TrafficRouting myTrafficRouting = new TrafficRouting(myTraffic);
  myTrafficRouting.setUpRouteStrategy(myRoute.Strategy);

  //
  // set the start time for our journey. This does not have to
  // be the current time.
  //
  myRoute.CurrentTime = DateTime.UtcNow;

  //
  // get Directions between A and B, accounting for traffic conditions
  //
  Directions myDirections = myRoute.GetDirections();

  //
  // find the end time for our journey, given that we start at startTime
  //
  DateTime startTime = DateTime.Now + TimeSpan.FromHours(1);
  DateTime endTime = myTrafficRouting.RecalculateRouteTime(myDirections, startTime);
}
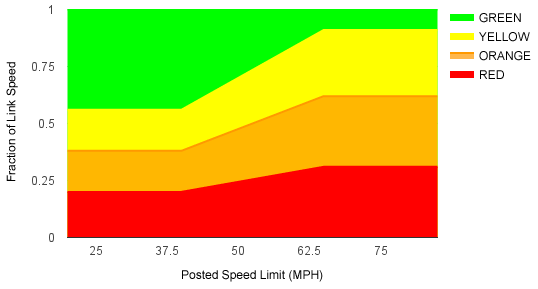
The default traffic style can be overridden with your own custom style. The default style represents the following traffic conditions:
| Color | Fraction of speed limit <40MPH | Fraction of speed limit >65MPH |
|---|---|---|
| Red | <20% | <31% |
| Orange | <38% | <62% |
| Yellow | <56% | <92% |
| Green | >=56% | >=92% |
At speeds above 40MPH and below 65MPH, the average fraction of the speed limit vehicles must travel at in order to color links adjusts linearly between the 40MPH fraction and the 65MPH fraction, as illustrated in the diagram below:
To create a custom traffic style, you will need to create a definition for the style in a Chameleon map style file (*.cam), and then add a 'style' attribute to a Traffic element within the 'TrafficConfig' file. The 'style' attribute points to the Chameleon file; the specified path is relative to the GeoStream root directory.
For example, in 'myTrafficStyle.cam', we can add our new custom traffic style definition:
#define $(traffic)
    [{class:1, limit:0.31, limitSpeed:65, lowLimit:0.20, lowLimitSpeed:40, color:(222,0,0)},
    {class:2, limit:0.62, limitSpeed:65, lowLimit:0.38, lowLimitSpeed:40, color:(239,102,0)},
    {class:3, limit:0.92, limitSpeed:65, lowLimit:0.56, lowLimitSpeed:40, color:(255,204,0)},
    {class:4, color:(51,177,0)}]
#end
In the code above, we have set each class with two fractional threshold values (limit and lowLimit), two speed values that specify whether either of the two thresholds should apply (LimitSpeed and lowLimitSpeed), and a corresponding RGB color value used to color links when the threshold has been met. See Adding a Traffic Layer for more information about these configuration parameters.
The first class above states that at speeds below 40MPH, a link will be colored red (222,0,0) whenever the movement of traffic on that link is traveling at less than 20% of the posted link speed. At speeds of 65MPH or above, the same link will be colored red only when the movement of traffic on that link is traveling at less than 31% of the posted link speed. Between 40MPH and 65MPH, the threshold will increase linearly from 20% at 40MPH to 31% at 65MPH.
Note: there is no limit to the number of classes that you may define.
Next, we need to add a 'style' attribute to the Traffic element within the 'TrafficConfig' file, to point to the 'cam' file with our new 'traffic' definition. This should look something like this:
<?xml version="1.0" encoding="utf-8" ?>
<Traffics>
   <Traffic ID="TrafficData"
               xmlns:gb="Telogis.GeoBase.Traffic"
               Refresh="0:15"
               style="myTrafficStyle.cam">
     <gb:InrixRealTimeTrafficSource
            Url="http://traffic.geobase.info/MarketLAXRealTimeTraffic.xml.zip"
            Zipped="true" />
    </Traffic>
</Traffics>